Quick Tutorial
With MeasureCAD, you can start taking measurements from PDF drawings and image files in just a few moments. Follow these four steps to quickly become familiar with the basic workflow. More detailed explanations are provided below.

Give Us Your Feedback
We would love to hear how MeasureCAD helps you with your work. If you encounter a bug or have ideas on improving the software, please fill out our Contact Form or use the MeasureCAD Users Forum.
Detailed Information
Contents
- 1. Getting Started
- 2. Creating, Opening, Saving Projects
- 3. Calibration
- 4. Page Management
- 5. Tools
- 6. Unit Systems
- 7. View and Performance Options
- 8. Table of Quantities
- 9. Using on a Tablet and Phone
1. Getting Started
With MeasureCAD, you can quickly and accurately measure objects within your drawings, save and organize them into a table, and export the result.
The software supports opening vector or raster PDF documents, as well as projects scanned into image formats like JPG or PNG.
The application runs directly in your web browser, so no installation is required, and you can easily launch it on any computer or mobile device. MeasureCAD is not a cloud application − it runs directly on your computer or tablet, which means that the data you load into it remains on your device and is not sent to internet servers.
For comfortable work, it is suitable to use MeasureCAD on a large monitor, but you can take it with you on a tablet/phone to perform quick measurements during a site visit.
2. Creating, Opening, Saving Projects
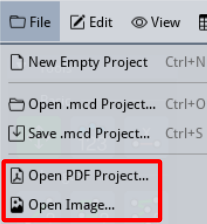
Opening Projects: To open a PDF document, MCD document or an image, you can simply drop a file in the app's window. Alternatively, you can click/tap the Open Project button on the welcome screen, where you can choose Open PDF Document... or Open Image.... You can do the same in the app's File menu in the top bar.
In all cases, MeasureCAD automatically creates a new project.
Multiple Page Support: If the PDF project contains multiple pages, all pages are automatically imported. You can use the Pages menu to manage them, or import other documents to new pages. To rotate the current page, use the View ➔ Rotate by 90˚ Clockwise menu option. See the section Page Management for more details on ordering, renaming, and deleting pages.
Saving Work: To save your work permanently, use the File ➔ Save .mcd Project... menu option. Your project, including all measurements in the Table of Quantities, will be saved on your disk drive in MeasureCAD’s .mcd format, allowing you to reopen and continue editing later.
Autosave and Recovery: Your project data is periodically backed up in temporary memory. In the event of an unexpected application crash, a recovery dialog will appear, allowing you to restore and save your work in progress. This feature is enabled by default and can be toggled in the Settings ➔ Enable Autosave menu.
3. Calibration
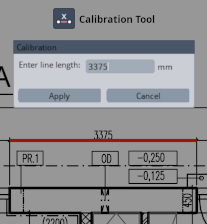
Imported drawings or photos often do not have a correctly defined scale. To ensure that all measurements are accurate and proportional to real-world units, it is necessary to calibrate the drawing before starting work. This can be done using the  Calibration Tool by marking a reference line on the drawing (using two points) and entering its real-world length.
Calibration is defined for each page individually. Once you complete the calibration, all existing measurements on that page are immediately recomputed. If your document contains multiple pages with the same scale, you can synchronize the current calibration by clicking the Apply to all pages button in the tool settings.
To prevent errors, the application displays a Not Calibrated warning message in the workspace whenever the page scale has not yet been set. If you need to change the calibration, simply create a new reference line; it will automatically overwrite the previous setting.
Pro Tip: Always use the longest possible known dimension for calibration. A longer reference line minimizes the margin of error caused by imprecise clicking, pixelation, or coordinate discretization (rounding errors that occur when drawings are exported to PDF or raster formats).
Example: If there is a small discrepancy of 5 units (due to snap-to-grid rounding or imprecise clicking) on a short 50-unit line, it introduces a 10% error to all measurements. The same 5-unit deviation on a long 1000-unit line represents only a 0.5% error, leading to much higher overall precision.
Read more about calibration in our blog post.
4. Page Management
Your projects may contain multiple pages (e.g., floor plans for each level of a building, elevation views, or reference photographs). Use the Pages menu in the title bar to manage them. This menu allows you to:
- Insert a new page with a PDF or image using the Add page button.
- Switch pages by clicking/tapping their page label. The current page is always marked with a check mark.
- Rename a page using the edit icon, which reveals a text field for the page name.
- Delete a page: Click the edit icon to enter editing mode, which then reveals the delete icon.
- Change the page order by dragging and dropping the page label.
- Rotate the current page in the View ➔ Rotate by 90˚ Clockwise menu.
5. Tools
MeasureCAD provides a set of tools for navigating drawings, calibration, counting objects, and precisely measuring lengths and areas. All measurement results are automatically saved into the Table of Quantities, where they can be organized, edited, and priced. All measuring tools also allow customization of line color, enabling/disabling snapping, and angle constraints (e.g., restricting lines to 45° increments) to ensure accurate measurements.
5.1. Basic Tools


Calibration Tool: You can use this tool to calibrate the page to the correct scale by selecting a line segment on the drawing and entering its known real-world length. This ensures that all measurements are accurate and proportional to real-world units. See more information in the Calibration section.
5.2. Length Measurement Tools


5.3. Area Measurement Tools


6. Unit Systems
MeasureCAD supports both metric and imperial units. You can choose the unit system in Settings ➔ Unit System menu. If you switch the unit system, all new measurements will be taken in that system, and all previous ones retain their original system. The imperial system offers three display formats for feet: decimal feet (e.g., 10.54'), feet with decimal inches (e.g., 10' 6.48"), and feet with fractional inches (e.g., 10' 6-1/2").
Important note on rounding in fractional format: When using the fractional format, the displayed fractional value may be rounded. Internally, however, MeasureCAD always computes all calculations in full precision. This may result in a situation where the displayed sum of multiple measurements does not exactly match the value you would get by manually adding the individual, rounded fractional measurements.
Example: If the system rounds each displayed measurement to the nearest 1/8", manually summing these individual rounded, fractional values may give a different value than the sum of the precise internal values displayed by the software.
7. View and Performance Options
The project view and application performance can be customized in the View and Settings menus in the title bar.
7.1. Visual Settings
- White Background: This option only applies to vector-based PDF documents. It lets you switch the background color between white (default) and black. When the option is deactivated, i.e., when the background is set to black, all originally black lines are displayed as white. This option only affects the background and pure black lines − it does not change other line colors or embedded images.
- Invert Colors: This option inverts all colors in the drawing, except for pure black and pure white lines, which are controlled by the White Background setting.
- True Line Thickness: This option only applies to vector-based PDF documents. By default, MeasureCAD keeps lines thin when zooming, which allows for precise work. Activating this option disables that behavior, i.e., lines are displayed with their actual thickness as defined in the PDF file.
- Highlight Quantities: Dims the drawing canvas to highlight displayed items from the Table of Quantities. You can adjust the dimming using the "Background Dimming" slider. You can also activate this feature directly in the top bar via the icon .
- Fit to View: Centers the drawing and zooms in or out to best fit the drawing within the viewable space.
- Rotate by 90˚ Clockwise : Rotates the current page by 90 degrees clockwise.
7.2. Performance Modes
The application automatically optimizes rendering smoothness. However, if you need to manually force specific behavior, you can do so in the Settings ➔ Performance menu.
- Adaptive (default): An intelligent mode that automatically balances display smoothness based on the current load of your computer or tablet. This option is suitable for most users.
- High: A mode for manually forcing the highest possible smoothness. Suitable for powerful workstations.
- Balanced: An economical mode that reduces hardware demands. It acts as an effective battery saver, which is especially useful when working on a laptop or tablet without a power source.
8. Table of Quantities
Table of Quantities collects all measurements taken from the drawing, along with user-defined numeric entries. Table items can be named and organized into a hierarchy. You can perform custom calculations on items, apply pricing, and finally export the table.
The table is structured as a two-level expandable list where each Parent Item can include several Child Subitems below it. Each Parent Item also contains a dedicated formula row, which allows to perform user-defined calculations on its subitems; by default, the formula simply sums the subitems. The table hierarchy can be extended beyond two levels using the Grouping function (see section Item Grouping/Ungrouping).
The table allows the following functions:
8.1. Adding Measurements
A measurement is automatically added to the table the moment you start drawing it. It can be added:
- As a New Parent Item: If no item is active, a new Parent Item is created at the end of the table to contain the new measurement.
- As a Subitem: If a Parent Item is active, the measurement is added as a Subitem to that parent.
An item becomes active after selecting its checkbox and is highlighted with a blue background.
8.2. Adding a Custom Item
You can insert manual entries that represent elements not measured directly on the drawing, such as the height of a wall (when measuring in a floor plan), or an arbitrary coefficient. These items can be added:
- As a New Parent Item: If no item is active, click/tap the
 button to create a new Parent Item with the custom entry at the end of the table.
 - As a Subitem: If a Parent Item is active, click/tap the
 button to add the a Subitem with the custom entry to the active Parent Item.
8.3. Inserting a Section
The table can be clarified by adding colored sections. Use the  button to add a section. The section is added:
- At the end of the table: If no item is active, the section is added at the end of the table.
- Above an item: If a Parent Item is active, the section is added above that Parent Item.
8.4. Item Numbering
The application automatically generates numbering that dynamically adjusts to the structure of your table. The system combines linear and hierarchical numbering to maintain a single main sequence for the entire table:
- Main sequence: Sections and standalone items (those not placed within any section) are numbered sequentially with whole numbers (1, 2, 3, ...).
- Hierarchical sub-items: Items placed inside a section inherit the number of that section and add their own index.
- Example: If a section is numbered 3, the items within it will be numbered 3.1, 3.2, etc.
8.5. Customizing Items
Each table item can be customized. Available options include:
- Name/Description: Each item can have a custom name or description. By default, measurements are named according to their type (e.g., Line Length or Polygonal Area), custom entries are named Custom Quantity by default, and the description of a Parent Item (or a Group) defaults to Mixed Quantity.
- Visibility
 : Each measurement has a color-coded visibility toggle to show/hide the measurement on the drawing. Toggling visibility for a Parent Item (or Group) shows/hides all its subitems.
 - Page Indicator: If a measurement is not visible on the current page, a page indicator is displayed instead of the visibility toggle. Clicking/tapping the indicator switches the project to that page, which is useful to quickly view the measurement.
- Unit: You can choose a unit for a custom measurement using the drop-down menu (in the Unit column), or specify your own unit by selecting the Custom field.
You can set the Auto unit for the Parent Items (and Groups), which automatically infers the most suitable unit based on the defined formula. If the unit cannot be determined automatically, the symbol ? is shown, which can be overridden by selecting the desired unit manually. - Row Context Menu: You can click the button to open a row context menu with additional options including:
- Deleting a row.
- Changing color of a measurement or a section.
- Moving item to a different page.
- Editing measurement's shape or properties.
- Quantity conversion: Measurement items created by the Rectangle Perimeter Tool, Rectangular Area Tool, Polyline Length Tool, and Polygonal Area Tool allow converting lengths to areas and vice versa.
8.6. Custom Calculations
The Table of Quantities allows performing custom calculations in a similar way to spreadsheet processors such as Excel and LibreOffice Calc. Each Parent Item contains a formula that you can use to combine its Subitems, i.e., measurements and manually entered items. Each Subitem is assigned an identifier (A for the first, B for the second, etc.) which is used to reference its value in the formula. The formula supports standard mathematical operators (addition, subtraction, multiplication, division, and exponents), decimal numbers, and parentheses for nested computations.
The following picture shows a formula for computing the elevation area of exterior walls:
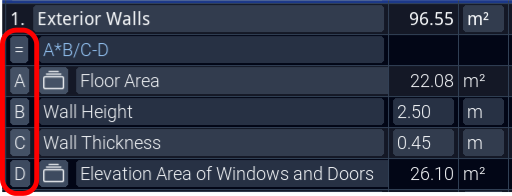
You can speed up formula creation by clicking in the formula text field − all Subitems will turn into clickable links. Clicking a link inserts its identifier at the current cursor position. Furthermore, you can use the buttons next to the formula and Subitems (marked with a red rectangle in the figure above) to access templates like Multiply by number and Sum all.
If a Subitem is missing in the formula, its identifier is marked in red.
8.7. Removing Items
Click/tap the  button to delete selected items. You can also remove an item using the row context menu and selecting Delete.
8.8. Item Duplication
You can duplicate rows either as links (connected copies) or as new independent items (unconnected copies).
- 1. As Links (Default): A link shares the data with the original item, meaning any modification to the original item is immediately reflected in its duplicates. This is useful when you want to use a single measurement or a set of measurements in different calculations. Click/tap the
 button to create linked duplicates of selected items.
 - 2. As New Independent Items:
This option creates duplicates that are independent of the originals. Modifying the original item does not affect the duplicates. To create copies of selected items, press the Ctrl key and click the
 button. On touch devices, use the app menu: Table of Quantities ➔ Duplicate Selected Items as New .
 - 3. As a Single Link to Parent Item:
The two options above create a duplicate for each selected subitem. This option creates a single link to the entire Parent Item. This is useful, e.g., for pricing the same measurements with different prices. To create the duplicate, use the app menu: Table of Quantities ➔ Duplicate Selected Items as a Single Link .
Duplication Rule: If the entire Parent Item is selected (i.e., including all Subitems), a copy of the entire Parent Item is created. If only certain Subitems are selected, copies of these Subitems are created, which remain part of the original Parent Item.
8.9. Item Grouping/Ungrouping
8.9.1. Grouping
Use grouping to combine items into a single group for better organization. This creates a Parent Item (the Group) that contains the combined Subitems. This mechanism extends the table hierarchy beyond two levels, allowing you to create complex nested structures. For clarity, however, we recommend keeping the number of levels as low as possible in practice.
To create a group, first select the Subitems you wish to combine and then click/tap the  button in the table header. All selected items will be moved into a newly created Parent Item (the Group) at the same level of hierarchy. Alternatively, you can access the grouping command from the main in-app menu: Table of Quantities ➔ Group Selected Items.
Grouping Rule: Grouping behaves differently depending on which items are selected. If you select a combination of Parent Items and Subitems, two distinct situations may occur:
- Multiple fully selected Parent Items: A single new group will be created to contain all selected Parent Items.
- Only some Subitems from a Parent Item are selected: A separate group will be created for each set of selected Subitems.
8.9.2. Working with Group
Each group functions as a regular Parent Item, i.e., it can contain measurements, custom items, and has its own calculation formula. Each group contains the button located next to its name. By clicking this button, you can open and edit its contents. To return back to the previous level of the table hierarchy, click the  button.
8.9.3. Ungrouping
To break a group apart into individual items, first select the group, press the Ctrl key and click the  button. You can also use the main in-app menu: Table of Quantities ➔ Ungroup Selected Items.
8.10. Items Reordering
The order of items can be easily changed by dragging them to a different place. You can start reordering by clicking the  button, which reveals the handles that you can use to drag the item to a new position in the table. Items can also be dragged by grabbing the item's checkbox.
Using drag-and-drop, you can also change the item hierarchy as follows:
- Parent Item into Parent Item: Moving a Parent Item (1) into another Parent Item (2) makes Item (1) a Subitem of Item (2). Item (1) will automatically be converted into a Group.
- Subitem between Parent Items: If you move a Subitem to a position between Parent Items, a new Parent Item is automatically created to contain this Subitem.
- Subitem into Different Parent: A Subitem can be simply moved into a different Parent Item.
8.11. Multiple Selection Mode
By default, you can select only a single item in the table. To simultaneously select multiple items, hold the Ctrl key while performing the selection. The same effect can be achieved by enabling the Multiple Selection Mode in the menu: Table of Quantities ➔ Multiple Selection Mode.
When multiple items are selected, some actions in the table have a different behavior:
- Deleting items: The system will remove all currently selected items, regardless of their position or level.
- Adding a new item or measurement: A custom item or measurement is always added into the active item (highlighted with a blue background).
- Adding a section: A section is always added immediately above the active item.
Active Item Rule: When multiple items are selected, only the one that was last selected is designated as the active item and is highlighted in blue.
8.12. Price Calculation
The Table of Quantities can also be used for quick pricing of simple budgets to get an initial cost estimate for the entire project. To activate/deactivate the price calculation mode, click/tap the  button. Activating this mode adds two new columns to the Table of Quantities: Unit Price, and Total Price. These columns allow you to quickly price individual Parent Items. A total price is automatically added to the table footer, and subtotals are calculated for each section.
8.13. Table Expanding/Shrinking/Collapsing
The Table of Quantities offers three display modes: Normal, Expanded, and Collapsed.
Normal Mode (Default): The table is in the default state displayed in a smaller window in the left bottom corner, the text has a smaller size in this mode. This mode leaves more space for the drawing area.
Expanded Mode: This mode maximizes the table height and enlarges the text size for more clarity, while still leaving sufficient space for the drawing on the right side. You can expand the table by clicking/tapping the  button and return back to the normal size using the
  button.
Collapsed Mode: In this mode, the table is minimized and displayed as a small icon  in the left bottom corner. You can collapse the table by clicking/tapping the button in the table's window title bar or by double clicking/tapping the title bar. Click the small icon to return back to the previously active (Normal or Expanded) mode.
8.14. Export to PDF or CSV
The Table of Quantities can be exported to several file formats, which allow for sharing, printing, or further processing.
Export options are available under the Table of Quantities menu:
- Export to CSV...: Exports the unformatted table to a CSV text file for easy processing in any standard spreadsheet software (e.g., Excel, Google Sheets, or LibreOffice Calc).
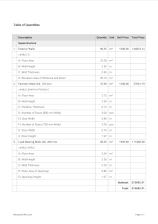
- Export to PDF...: Exports the formatted table to a PDF document for printing or sharing with customers, including all Parent Items and their Subitems.
- Export to Parent Quantities to PDF... : Exports the formatted table containing only the Parent Items to a PDF document. This export serves as a simplified summary of quantities.
Export Rule: The entire table is exported if no items are checked. Otherwise, only checked Parent Items (possibly including Subitems) are exported.
9. Using on a Tablet and Phone
MeasureCAD is designed to be fully responsive and to adapt to smaller screens. You can use it both in portrait and landscape mode. All navigation and measurement functions can be performed using touch gestures on touch devices:
- It is possible to move around the drawing by dragging with one or two fingers.
- Zooming in and out of the drawing can be done using the standard pinch gesture (two fingers).
The Tools and Table of Quantities windows can be easily collapsed so that they do not take up so much screen space. This is especially useful on small screens, such as a mobile phone screen. Collapsing the window can be done by clicking the button in the window header or by double clicking on the window header itself. Click the small window shortcut icon to return to the previous uncollapsed mode.
Fieldwork Tip: If you are using the application on a tablet without a power source, we recommend selecting the Balanced performance mode in the Settings ➔ Performance menu to extend your device's battery life.